|
Greetings from the sunny Midwest of the US of A, relaxing at my parent's house after the SETAC North America meeting. After a busy week of science, networking, and some amazing Utah beers, the big conference is done, talks and meetings about future meetings and everything in between. While there’s still a lot to be done, coming back home from these conferences is always a refreshing experience, thinking about spending time with new colleagues and old friends and with new ideas and renewed motivation to spur me through the rest of the year.
As promised in a previous post, I wanted to finish off the tutorial for the five easy* steps for a perfect** presentation. I’m glad that the talk went well and that even when being placed during one of the last sessions of the conference when people are already heading home that there were a decent number of people who came to hear my talk. This post will focus on how I applied the lessons about the concepts of the story, take a bow, and break a leg to make the talk in the best way I could, even after a busy week of networking and meetings within meetings to talk about future meetings. 3. THE STORY I had previously finished the introduction part of my story board for a previous post, and once I developed an outline for what I wanted to say I went on to make the actual power point slides. While I had given a talk about some of this data before, this time I wanted to feel more confident with how I presented the introduction and took the initiative (and a few minutes outside of my lab work) to think about how I wanted to tell this story. While narcosis is not a new topic of interest either in SETAC or for Unilever, I hadn’t yet thought about how I saw the problem and potential solutions. And while there are other experts on narcosis out there, my goal with this talk was to present my perspective based on my own background reading and my own vision of the problem. I was much happier with how these slides came out than last time, and was glad to have taken the extra time to think about the problem and the solution(s) more in-depth as opposed to just saying word-for-word what someone else had previously said. With this revitalized excitement and a bit more ownership of my post-doc project, I found that once I made the introduction slides (which did take some time, with lots of new graphics and thoughts about how to display different pieces of information), the rest of the talk came more easily. It was just a matter of deciding which figures to show in the short amount of time I had and what was most relevant to show that addressed the questions I presented. For the methods overview and experimental background, I focused on using flow chart-style slides that depicted what questions I was answering with what analyses (see the end of the paragraph for the middle section of my slide deck). I kept these questions as headers of my slides that showed the results relevant for each section, in order to make it clear to my audience why I was presenting what I did. I avoided using tables or figures with really small font, because nothing is quite as awkward as presenting results that no one in the audience can see or interpret. Before the talk began I actually took out an entire slide because I realized during practice that it wasn’t adding anything to the presentation. I put the slide at the end of the talk as a back-up just in case there were specific questions related to it, and I found that when I took that superfluous slide out that the story flowed much more nicely.
4. TAKE A BOW
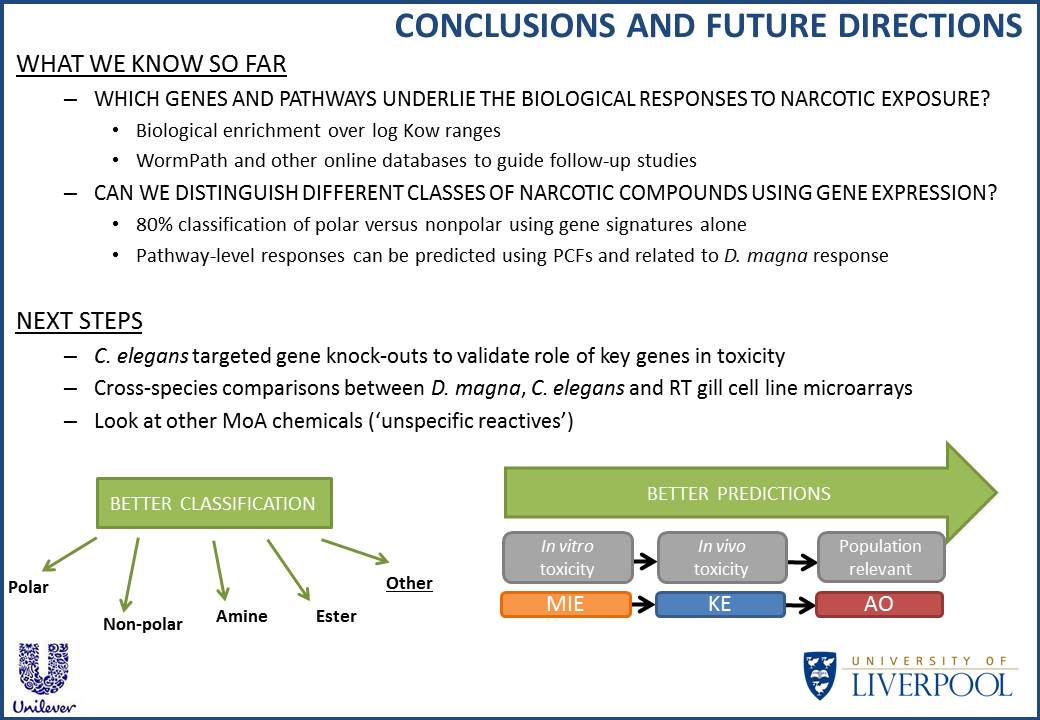
I’m in debt to my presentation co-authors on this one. Initially I had a rather messy slide summarizing the findings and listing all of the experiments we were planning on next. Thanks to a comment about the slide, I rearranged how I talked about future experiments to make it look more streamlined. I also gave a big-picture look at how the project fit in with Unilever’s aims and goals as well as the project itself. In the conclusions I presented here, I first focused on what did you learn about the problem? by breaking down results specific for the two questions I presented. Then instead of just listing out all of the things we could do for this project, I focused on looking at what still remains unanswered but is important for solving the problem? and how that fit into the overarching goals and objectives for the project on a wider scale. I also had a slide thanking co-authors and collaborators, which I prefer to see at the end of a talk as opposed to the beginning. It keeps the flow of the presentation more smooth and makes more sense logically to thank people that helped you out with a project after you actually talk about what that project is. In addition to the acknowledgements slide, I also include a second thank you slide to thank the audience and to have a holder photo or something visually appealing. I do this so you can transition away from the acknowledgements slide and have a holding slide while you answer questions. This doesn’t leave a distracting slide full of collaborator names to look at, and doesn’t force you to use the black screen that powerpoint gives back when you finish a presentation. During my PhD I used pictures from the field sites I worked at, or happy little mosquitofish swimming around, and now I enjoy highlighting my adopted home town of Liverpool and to make a comment about how it’s not always raining in England. One thing I forgot is to put my contact information and twitter handle on the last thank-you slide. This makes more sense than having it at the beginning, since it will be the slide that will stay on the presentation screen for longer than if it's at the first slide. Something to remember for next time!
5. BREAK A LEG!
Despite other scientists telling me that I’m a great presenter and having won a few SETAC platform presentation awards, I still get nervous and have a few moments of panic and self-doubt before any talk. Because my last talk on this project hadn’t gone that well, I was especially nervous and wanted to do really well, this time with a potentially much larger audience of peers and collaborators. No pressure! With all this in mind, I took the time I needed to practice my talk and to make sure that I had my transitions and talking points solidly in hand. I practiced the talk two times completely through, and realized after my first go that I had no idea how to start the talk. I spend time thinking about what precisely I wanted to say once I clicked off from the title slide, and once I had that sorted out I actually wrote down what I wanted to say just to get it more 'stuck' in my mind. I didn’t’ take down my notes up on stage but when I practiced the talk a second time I jotted down the key points that I wanted to be sure to say and things that weren’t clearly written on my slides. Writing them down during the practice, but not reading them from paper during the talk, ensured that I remembered them when needed without looking awkwardly at notes or index cards while searching for a thought during the actual talk. At the start of my talk I saw the lead author of a paper I cited, and a SETAC veteran and all-around nice guy, sitting in the audience. I thought he might show up so I acknowledged his presence in the room when I talked about his paper. Maybe a bit over the top but I feel it’s weird to talk about someone’s paper when they are sitting in the audience, so I embraced the awkward and said hi to the guy. (Follow-up note: He said hi to me after my talk and told me he really enjoys seeing where my work is going. Awesome!!). Final hurdle for the presentation itself: My talk was being recorded, meaning that all my collaborators and Unilever folks could watch it and listen to me after the meeting. The talk I subbed in for was also recorded at the last SETAC meeting, and I remember being horrified while listening to myself. I had a bit of a cold at the time and was sniffling LOUDLY during the entire talk, all captured on audio and immortalized for SETAC history. With that memory in mind, this time I made a quick dash to the bathroom to blow my nose before the talk and paid attention to myself as I spoke, making sure to do any coughs or sniffs away from the microphone. I think this time I sounded much better, but I’ll have to force myself to listen to my talk yet again and make sure I didn’t make some other strange noises to replace the sniffling. I also took a cup of water up to the podium with me and took one drink during the talk because I tend to have a bit of dry mouth from nervousness. I time my drinks so I don’t take too large of a gap in time between thoughts. What I normally do is grab the cup when starting a slide, hold it in my hand while talking through the slide, and then take a quick drink and set it down as I click to the next slide. It keeps the thoughts moving more smoothly but still allows me to give my parched throat a rest during the 15 minute talk. I was happy with how the talk went, and not because I did all of slides perfectly with no awkward sarcastic comments or mis-steps over words. I felt comfortable because I was telling a story that I had crafted instead of repeating what someone else had explained and said was important. I listened to advice from co-authors to help make the finishing slides more clear and concise. I recognized that I needed to do a couple of practice runs, even though this data was not brand-new, to make sure that the story came across accurately but was also interesting. That being said, I think I did make at least one sarcastic joke about my science hidden in there somewhere, which will soon become immortalized on the SETAC website for all to hear and enjoy. Maybe if research or style blogging doesn’t work out I can always take my show on the road as a nerd comedian. Wouldn’t that be a wonderful way to give back to the world...
In previous posts I laid out five (plus/minus one or two) easy* steps for developing a scientific presentation. For today's post I'll be going into more detail about the preliminary work that you should do before you set off on making a perfect** presentation. As an added bonus, you'll get a sneak-preview of my presentation at the upcoming Society of Environmental Toxicology and Chemistry (SETAC) North American annual meeting located in the ever chic and always stylish capital of Utah, Salt Lake City. So not only do I get a blog post from my efforts, I'll have already put some time and effort into my talk before I get to the meeting. That's what we call in science a win-win situation, and in my case even better than free pizza at a seminar you were already actually planning on going to.
*Easy: Remember that nothing good in life comes that easy, as evidenced by the fact that I spend 3 hours making 4 slides for this talk. **Perfect: In the end I'll probably end up getting nervous and making a sarcastic comment about how my bipolar membranes look like lollipops, but that's OK, because the story is what’s important and the story is what they’ll remember. Step 0. Make a story board For my SETAC presentation, I get 12 minutes for the talk and 3 minutes for questions and answers. Following the presentation rule of thirds means the first 1/3 is background/broad appeal, the second 1/3 is in-depth details and concepts for people in my field, and the last 1/3 is my novel contribution to the field. Because of this, I printed out blank Powerpoint slides in groups of four. I'll focus on having 4 minutes of background information/introduction, 4 minutes of detail-oriented methods and ideas relevant for my results, and 4 minutes of my actual results. It may sound like a small amount of data, but having given a good overview of the big picture of my project, as well as a bit more in-depth review of relevant methods will make the data I show more clear and understandable, and therefore more memorable. 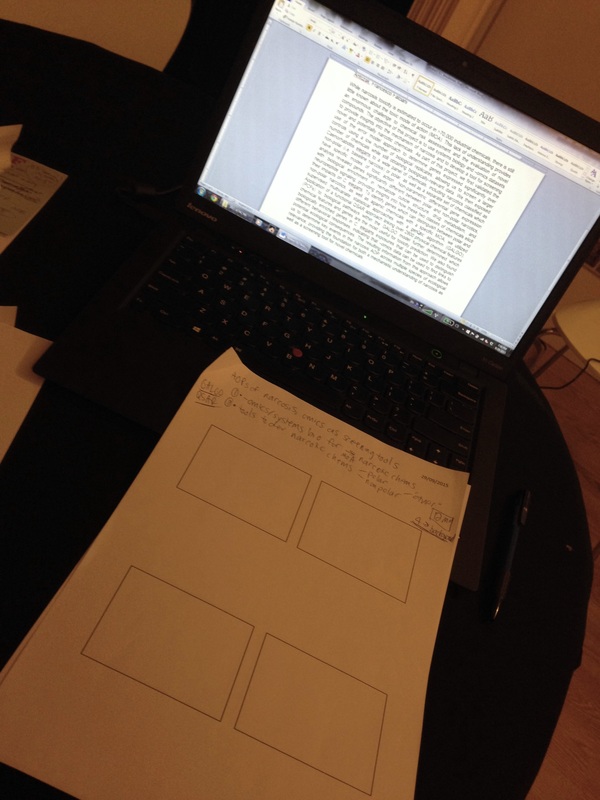
My storyboard set-up, complete with conference abstract so I could remember what I was supposed to present :P
With my storyboard printed and ready to go, I started off by going back to the original conference abstract to make sure I set off to present what I said I was going to present. I started with putting two things in my mind: the objective of the work to present in my talk and my audience. Writing down your objective again before starting on slides helps focus your mind on the bigger picture of what you want to present. In my case, the objective of the data for my talk is focused on the molecular mechanisms of narcosis toxicity and developing new screening tools for different classes of narcotic chemicals (as part of my post-doc project with Unilever). My audience in this case is one I know quite well: SETAC regulars who will be coming to the session on '-Omics technologies and their real-world applications.' There will be quite a few people in this audience that I'll know personally, and others whose work I'll be mentioning in my slides. No pressure!
With my audience and objective laid out, I set to work on the slides. Following the rule of thirds, I started off with background information/broad appeal, to get everyone on the same page. While most of this audience will know about concepts like gene expression, risk assessment, and adverse outcome pathways, I want to make sure that someone popping over from an environmental chemistry session will also be able to follow along. At the same time my subject area is not one of the hotter topics at SETAC, so a bit of background in terms of biology and relevance is necessary here. 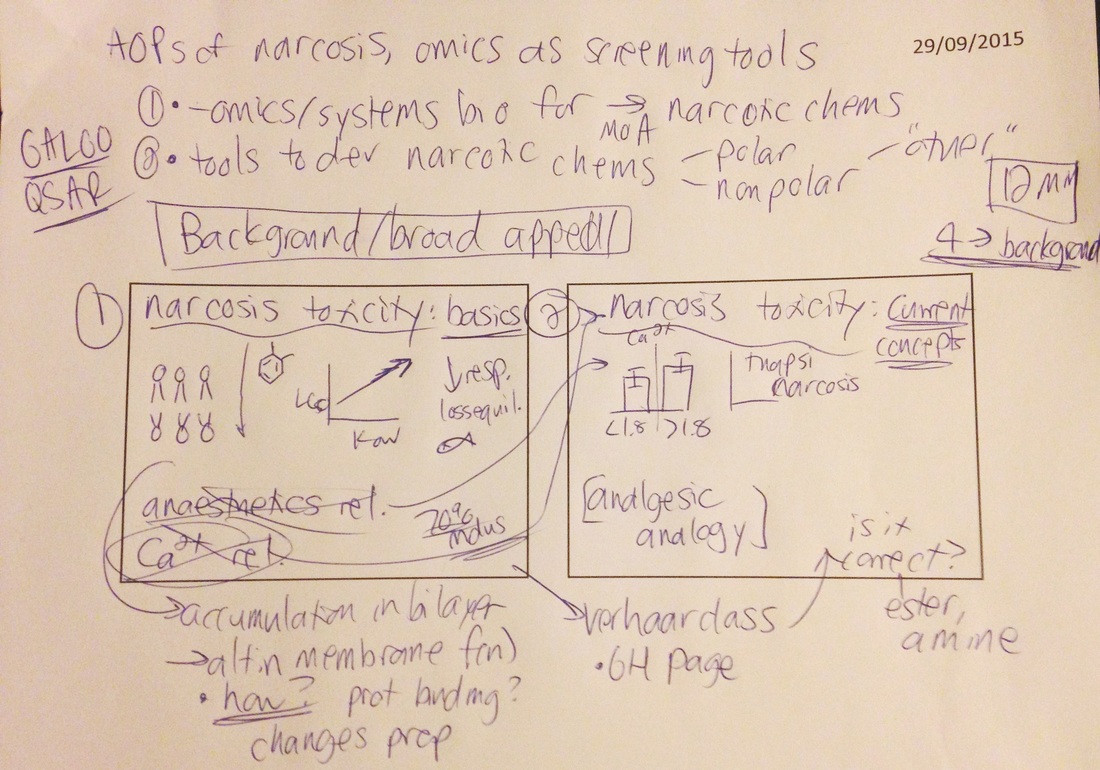
My project objective/topic and my two introductory slides. Bonus: my terrible, terrible handwriting!
I decided to start off my talk with a description of narcosis toxicity. As I said, this isn't a hugely hot topic in my field, so I planned on making the first two slides as an opportunity to teach anyone in the audience who hasn't heard it much before. I split this into two parts, one focusing on the basics/textbook toxicology concepts of narcosis, and the second going into more details on recent papers and new understandings. Here I also sketched out what to put on each slide, including my lollipop-esque membranes, and what figures from the literature I wanted to include.
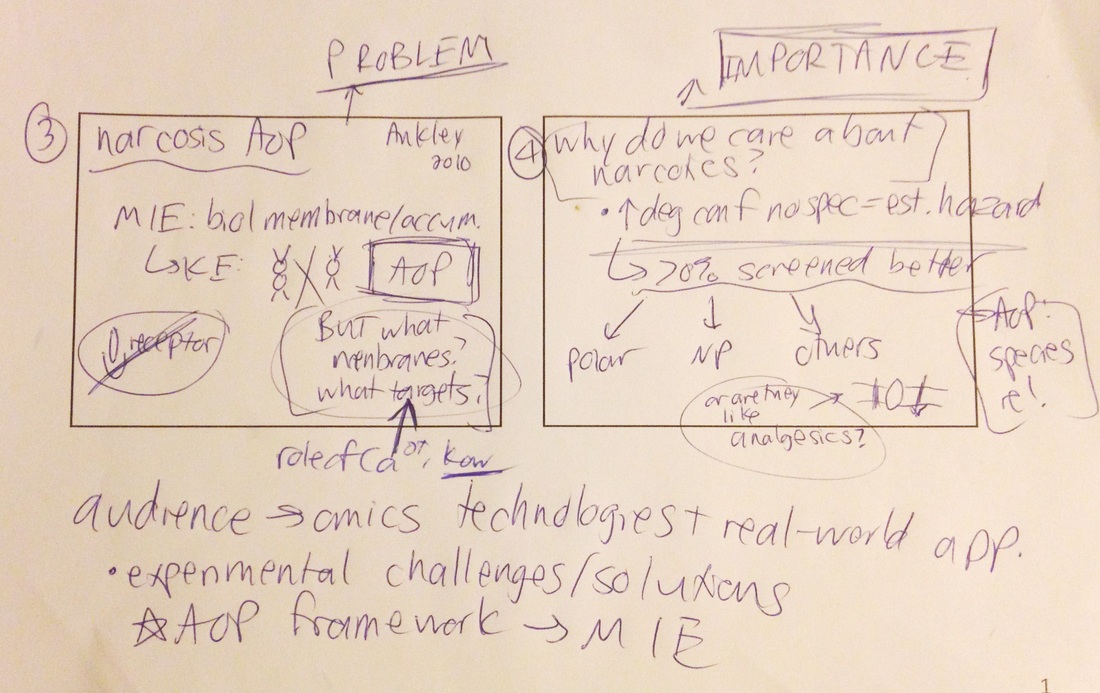
Introducing the problem and its importance
So now that I've put everyone on the same page about what narcosis is, I'll then present the specific problem I'm looking into, in this case the lack of understanding of the molecular mechanism of toxicity. This will be in the context of work done by senior scientists who will most likely be in the audience, so I've made a note to cite their work. This brings in concepts that I discussed in more detail in Step 1 of the perfect** presentation, where you get people's attention by describing a problem in your field, why that problem is important, and then in the next slides how you solve it. For this talk I present the problem and then talk about how knowing mechanisms of toxicity are relevant for accurate risk assessments for chemicals, especially narcotics. Hook, line, and sinker!
The transition into a new section and additional context of the project that's more focused on people in my field
At this point I've now laid out the objective of my project, the specific questions I'm asking, and how they will address the issues I presented in the introduction. This slide (#5) also comes at a time where I am transitioning between background information and getting into the nitty gritty of my project. You can skip trying to decipher my bad handwriting and read more about Step 2 and how you present setting out to solve the problem you just talked about.

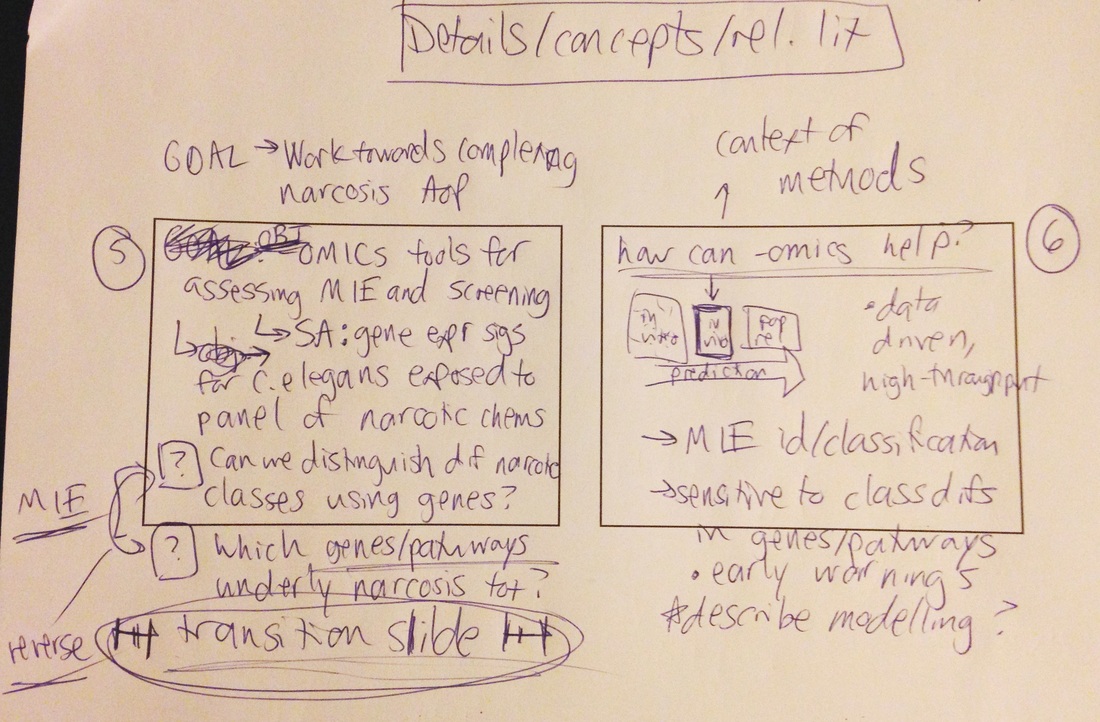
More in-depth information for people in my field, as well as my project's experimental design
After the transition slide and describing my project's objective and questions, I then go into a bit more background information to provide context for the data which I'll show next. This includes one slide (#6, see panel above) on how high-throughput molecular techniques can help address these questions, and one slide (#7) on my model system and why we chose it, including background information of toxicity of narcotics in my model system. I then give a schematic of my experimental design and will talk here about the analytical methods I'll be presenting. I also made a note to myself to make an 'emergency' slide with details of one of the methods of my project. As its only a small part of what I'm doing but something that a few people might question, I'll make a slide to have at the end in case I get a question after the main part of the talk.
So with those eight slides I'm now 2/3 done with my talk. The last four slides will be data and conclusions, and to prevent any earth-shattering findings from escaping into The Internet too soon (and to motivate any SETAC meeting attendees to actually come to my talk, on the last day of the conference in the late afternoon!), I'll save those sketches for when I make the real thing. Step 1. Set the stage and Step 2. The Hook To give you a sense for how the introduction slides actually ended up looking, apart from my terrible scribbling, here are how they turned out so far. I added animations in the actual presentation so the content doesn't all come up at once, which also allows what I say and the components of each slide to come together in a more logical progression. As an aside, I have no idea the appropriate color for biological membranes, so I am currently thinking of new ways to see if I can make a bipolar membrane not look like blueberry lollipops. To be determined for the next blog post.
As you can see, there's a lot you can convey with lollipops and arrows, and remember that at the same time that your slides will be on screen you'll also be speaking (as scary of a concept as that seems). Think about how your words and your slides can work together, and keep to a minimum any redundant or unnecessary text as well as figures or diagrams that may be too detailed or too small to see or understand clearly. Before jet-setting off into your experimental design, take a slide to transition from introduction to experimentation while at the same time giving your audience a clear vision of what you are doing and what scientific questions you are answering (e.g. the hook).
While I've touched briefly on some of the last three steps while working on my storyboard (the story, take a bow, and break a leg), we'll save a more in-depth analysis of these for when we get closer to the actual meeting. It will also give me a chance to finish making my data slides, and to practice my talk before giving the real thing to a live, scientific audience, including but not limited to collaborators, experts in the field, and potential future employers. Again, no pressure. Until next time, happy storyboarding!
Now that you’ve done most of the ground work while making your story board, the rest of the steps should fill themselves in easy enough. You’ve done all the lab work, analyzed the data, and gone through the literature, so now all that’s left is to tell your part of story:
1. SET THE STAGE The first crucial question to answer at this point is Who’s in your audience?, because this will determine what goes into those crucial introductory slides, the ones that are going to get everyone’s attention on you instead of motivating them to beat their high score in Candy Crush. You should keep the audience in mind throughout all of the steps, but it’s especially important during the introduction to avoid losing their attention or causing any confusion by assuming the audience is familiar with any aspect of your research. Watch out for jargon/abbreviations/concepts that you use all the time in your lab meetings. It’s easy to forget that not everyone else in the world knows what mTOR or KNN is, does, or represents. Think about the crucial idea or scientific principle that’s at the crux of your research, and have a slide dedicated just to explaining that. Then you’ve made sure that everyone’s on the same page in terms of background knowledge before you jump in to the more subtle and specific aspect of your project. Once you’ve prepared an introduction that will grab your audience’s attention, the next step is setting up your talk in a way that keeps their attention. It’s easy to stay interested with someone explaining a new concept or a system they don’t work with, but if you dive too quickly into the specifics of your project without giving them a reason to listen to your favorite acronyms, they’re going to go back to beating their previous score on Candy Crush regardless of how good your first couple of slides were. One way to do this is to frame your presentation not as a series of facts, but to present a specific problem, its overall importance, and your approach to solving it. In the introduction you should focus on explaining the problem and its importance, and wait for step two to talk about how you’re setting out to solve it, so you can evoke curiosity in your audience. Be careful not to overstep your bounds here: it’s easy for people working in cancer biology to say that they’ll save everyone from cancer, or those working with global warming to say that the world will be completely flooded over in 10 years, but sensationalism will only get you so far. If you stay within the limits of what you’re doing and let your excitement and enthusiasm about your work come through, people will listen. Before moving on to the next step, a few extra tips of things to avoid: - Endless literature review/TMI amounts of data. Stick to background concepts that are necessary for the rest of your talk and mention papers that are directly related to your work, especially any crucial papers that exemplify the area. If people want to know more details, they’ll ask. - Acknowledgements at the beginning. Some people like this approach but I think it breaks up the talk too much. Wait until the end when people know what you’ve done already before you take the time to thank the people that helped you get there. 2. THE HOOK Now that you’ve peaked interest, it’s time to go back to the second important part of setting up your story: How are you going to solve the problem? This seems like a monumental task at first, but in essence, you need to provide an answer to a previously unanswered question, using the approach you’ll describe in the next step. My undergraduate honors thesis mentor was a proponent of using a pen and paper to help you think about concepts in a big picture way (similar to what I described in the last post). It’s something I took from his lab and still use when I work with my own project, presentations, and when talking with other scientists about how to set up their grant proposals, talks, papers, etc. It boils down to five things: 1) GOALS: The long-term ambitions for what you’re doing that go beyond the scope of your project itself. This should be related to the big-picture problem you described earlier. 2) Goals are (eventually) reached by fulfilling OBJECTIVES: What you’re specifically trying to achieve with your project. 3) Objectives are reached by addressing SPECIFIC AIMS: A set of experiments you’re doing that will address the objective. 4) In each of these specific aims are your HYPOTHESES: What you think the answers to the questions you’re setting out to address might be. 5) Your hypotheses then get answered by the EXPERIMENT(S) you run for each specific aim. While the GOALS can be inferred from previous slides, you can include them again as you present your OBJECTIVES and SPECIFIC AIMS. You may be very familiar with the HYPOTHESES and EXPERIMENTS (and the resulting answers), but in this step you should present them to your audience in the context of the the bigger picture which is framed by the GOALS, OBJECTIVES, and SPECIFIC AIMS. This is a transition point in the presentation, as you’ll just have given your audience a large amount of background information and will now be getting into the nitty-gritty of your project. The “hook” is set when you go from here’s a problem in my field and why it’s important to here’s how I’m going to address it using this fancy thing known as the scientific method. You’ve made it clear what your project’s relevance is in the wider scheme of the problem facing your field and also made it clear what exactly you’re setting out to do with your specific project. 3. THE STORY I can’t offer much advice for this section because you are the expert here, not me. Remember that when you talk to your audience too: No one, no matter how smart they are or how long they’ve worked in the field, knows all the finer details of your project like you do. That being said, there’s a few things you can do to help make your story shine crystal clear: - Use text sparingly, especially in methods sections. Powerpoint is best used as a visual aide. You can provide words as need be, but avoid long blocks of text unless they are crucial for understanding something in context. If you have a complicated method, make a schematic instead, even if it’s just using arrows or squares or stick figure mice. It’s easier to walk through your method using a diagram with the audience for them to understand how your experiment or study design looks like. They’ll ask for details on specifics of a method if they want them. - Keep reminding your audience of your hypotheses and specific aims. Break up your story into the experiment and results for each hypothesis and compile the results of your experiments and hypothesis support for each specific aim before moving on to the next one. This will also help break up your talk and allow you to synthesize your results as you go along, instead of having one long stream of information and then summarizing all of it at the very end. Set up your slides and your presentation with reminders of what your questions are and how you set out to answer them. - Make what you’re showing crystal clear. When you make a figure, you know what data went into it and what it shows, but in the 30 to 60 seconds that it’s on screen, someone outside your lab or your field may not be able to make much sense of it. Figures are the way you convince someone that the story you’re telling them is a good one, so make sure your figures are easily readable. One easy way to do this is to put a one-sentence description at the top of the slide telling what the figure shows/presents, for example “Knocking down Gene XYZ caused an 80% decrease in response to Drug ABC in mice” followed by a figure is much clearer than a header which says “Result for Specific Aim 3”. 4. TAKE A BOW And now for the grand finale, and for me, the best part of the presentation: being done! You just gave a long and detailed overview of your entire life’s work/thesis/project, so now would be a good time to remind everyone what you just told them, because some of them might have forgotten along the way. It’s not your fault or theirs, it’s just the nature of our brains to forget the majority of what we hear. After you remind your audience what you just told them, go back to your initial problem and your plan for how you set out to solve it. What did you learn about the problem? What did you make clearer about the problem through your research? What still remains unanswered but is important for solving the problem? Answering these questions to the audience will help frame your conclusion more strongly than ‘this is what we saw, this is what might be interesting later on for future work.’ Circling around back to the beginning again will also close some memory gaps for your audience, as you can remind them once again of what problem you set out to address in the first place and how you went about tackling that problem. 5. BREAK A LEG! The last step, after you’ve made all your gorgeous slides, is the delivery. As a caveat, this advice comes from a person who is NOT an expert in public speaking, or really speaking in general, the classic introvert who would rather spend her time reading and writing than standing at a podium in front of hundreds of people talking about science. The problem for introvert scientists is that in this day and age, at some point you’re required to stand up in such a room and talk about your science, so you might as well get good at it. Moral of the story is: if I can do it, so can you! There are many ways to improve your public speaking skills, but for me it boils down to one simple reminder. You’ll most definitely mess up something. You’ll forget to mention some part about one of your figures, you’ll stumble over a few words, you’ll say mTOWER instead of mTOR. And that’s OK! Minor mess-ups and stumbles will be forgiven by your audience, because it’s message, clarity, confidence, and enthusiasm that they’ll remember instead. If you focus on these last four things instead of perfecting every transition, figure description, etc., then you’ll nail the talk every time. Another simple thing to remember: You’re the expert in your project! So if you don’t explain something as well as you did in your head when you were practicing, remember that you’re probably the only one that will notice. A few more of my quick tips for this part: - No index cards! Being read at is not nearly as engaging as being talked to, so practice enough so you can give the talk without relying on a script. - Embrace the awkward. The clicker won’t work, you’ll bump into the mic and make some terrible sound, a bit of text goes off the screen. Don’t ignore these mishaps. Apologize for any misaligned text or mic issues and keep going. For technical problems, troubleshoot as best as you can and ask the session chair for help if need be. Most importantly during all of this: keep talking! If it’s taking an extra minute to load your presentation or to sort out how to advance the slides, thank the audience for the wait and give a longer introduction of yourself, your affiliation, or discuss the conference venue or city. It will keep the audience focused on you and not on the session chair frantically trying to find your presentation or remember how to use a computer. - Watch and listen to yourself. One of my least favorite parts of speech class in undergrad was going to the speech center and watch a recorded version of my speech. I realized how WEIRD my movements were due to my nervousness, including but not limited to a very awkward wide-legged stance and swaying from side like I had to pee. As much as I hated watching myself, it showed me what I needed to change and better ways to channel my nervous energy. Now I focus on talking more with my hands and taking a break with a drink of water when I need an excuse to not talk for a couple of seconds. Doing a similar exercise yourself will likely be psychologically painful, but once you see how your minor quirks appear to the audience, you can work on finding an alternative way to channel your nervousness and focus on relaxing and presenting your message instead. At the end of the day, remember that it’s your project and you are the expert, and if you don’t give the talk 100% the way you wanted it to go, it doesn’t mean it wasn’t a great talk. With the tips and tricks from this and the previous post, you can now head off on your way to a perfect presentation. Just remember that in this case, ‘perfect’ doesn’t mean that you won’t stumble over words, but instead that you will convey your message and story in a clear and convincing way. By focusing on your story and they key questions you’re focusing on answering, you will deliver a message that your audience will remember as well as one that you yourself will enjoy giving.
There are piles of books, tons of pamphlets, and a wide array of websites focused on how to give a good scientific presentation. So how am I, a classic introvert who gets nervous about speaking in general, qualified to tell you anything better or different than them? Simply put: I used to give bad presentations—really, really bad ones—with terrible Powerpoint templates, feeling constant unease while I stumbled over my words from nervousness, and overly-aggressive laser pointer usage as an outlet for my nervous energy. After an underwhelming PhD qualifying exam presentation, I set out to become better at presenting. I spent a good deal of time trying different approaches, pulling useful parts out from the heaps of hints and tips and listening to great scientific presentations before I figured out the method that worked best for me. I soon learned that there’s no such thing as bad presenters: we can all become good ones, but for some of us it takes more work than others. I then stopped just presenting my research and instead focused on how to tell the story of my work in a way that allowed me to share my science in the best way possible. I’ve now compiled the tricks and tips I’ve accumulated into a tried-and-true method: The Five Easy* Steps for a Perfect** Presentation!
*Easy? Nothing good in life comes that easy. And neither are presentations, for the 99% of us that aren’t naturally comfortable with public speaking. But it can still be done, so read on! **Perfect meaning you’ll share your story in an impactful and memorable way, not that you’ll deliver every word with perfection or not stumble over anything. Because the story is what’s important and the story is what they’ll remember. While the steps are easy, they are a bit long-winded in written form. So today we’ll focus on the preliminary steps towards a perfect presentation before you start to make your slides and tell your story. Step -1. Read the book Presentation Zen by Garr Reynolds (or just browse his blog) Like I said, before we get to the 5 Easy* Steps, there’s a few things you need to get sorted before you go to your computer and open Powerpoint. It may seem like it will take up a lot of time, but the steps that you do to prepare yourself for the main event are like stretching before a run: easy to forget and may sometimes seem inconsequential, yet essential to prevent hamstringing your success (or your hamstring for that matter). I found a copy of Presentation Zen at my university library and took endless pages of notes, but if you have $17 in your book budget you can pick up your own copy here. Garr can tell you better than I can how to design your presentation, how to make good-looking and accurate figures, and how to capture your audience with your simple yet captivating slides. It’s up to you to tell the story and let your voice fill in the gaps that your data can’t easily say on its own, but Garr’s tips and tricks will set you up for success in terms of design and thinking about the presentation itself before you start putting your story into slide form. Step 0. Make a story board Before you even think about opening Powerpoint, sketch out your main points, an idea of the content you’ll present, and an order for your story. This is a trick adopted from Presentation Zen but I’ve made it as a separate pre-step because it makes the rest of the talk flow much more nicely. It’s best to start with an open brainstorming session about your topic and your project before you lay it out slide by slide. When you have your big picture ideas in place, then you can focus in on how you’ll actually make the presentation using the story board approach. Set up your story board using an unconstrained media with whatever suits your style the most: blank paper and pen, whiteboard, sticky notes, tablet and stylus, restaurant tablecloth, anything that lets you get a wider perspective of your story and lets you move ideas around as need be. I like printing off a set of blank Powerpoint slides in the 3-slide format and writing on them directly because you can make notes to yourself next to each idea while still giving yourself space to draw out what can go on each slide. The goal of this step is to decide what you want to share, what order your findings should go in, and what the transitions between slides and ideas will be. You story board should help you lay out your slides in order to follow a single line of reasoning, which you’ll then bring to life during your actual presentation. While you are rearranging content in order to get your story across in the best way, having the story board enables you to have a wider vision of when content and ideas are introduced during your presentation. When you only see one slide at a time (as with the default Powerpoint slide mode), it’s easy to lose track of what you’ve already said or what message you want to convey 10 slides from where you are now. Drawing out your talk will also help you identify the transition points that you'll need to make clear as you shift from concept to concept so you don’t lose your audience in the transitions between ideas. While creating your storyboard, you should keep your audience in mind and always think of ways to keep them interested in what you’re showing. This means they need to understand what you’re presenting while at the same time becoming interested in learning something new about what your project brings to the field. A lesson passed to me by husband (via one of his grad school professors) of how to do this effectively is to break your talk into three equal parts: 1) Things that are easy to understand by a broad audience, 2) Things only people in your field will understand, and 3) Things only you will understand (also known as what you want to teach to the audience). These should be set up as equal thirds regardless of how long your talk is. For example, if you’re giving a 15 minute conference presentation, 5 minutes is easy stuff, 5 minutes is field-specific, and 5 minutes is your project. First 1/3: Set the stage with background information and broad appeal. Your goal here is to capture everyone’s attention by getting your audience all on the same page of understanding. Don’t assume that anyone has read a single paper in your area or knows what you’re talking about when you mention PCA or RPM or TGIF. Think of a conference you’ve been to where even though the overall field is the same (wildlife ecology, cancer biology, astronomy, etc), everyone at the meeting has a different specialty (arctic ecology, tumor suppressor proteins, quasars). You want to keep this diverse set of people interested at the same time, which means you have to talk about your work in a way that a diverse group can follow it. This will likely take some trial and error, but one easy way to figure out if you’re doing this the right way is to give this part of your talk to someone completely outside your field. If they can follow what you're trying to say, so can anyone else that goes to your conference presentation. Second 1/3: Cover in-depth details, concepts, and relevant literature that people in your field will understand and that those outside your field may not. People from your specific field of work will be there, probably sitting in the front row, who will be curious as to what you’ll say about their work. You know what they know already, so this is your chance to show them what you know and how your problem is going to solve an issue within the field. Because of their presence in the audience, this is also a good time not to directly trash someone’s previous work: if you found something convincing that underpins a previous study, let your results speak for themselves, and avoid an overly aggressive question or two after the talk is done. At the same time that you’re thinking about the experts, remember to keep the interested outsider on the same page as everyone else. Be careful not to overuse acronyms or jargon from your field when you make it to this section of your talk and instead use language that everyone in the room can follow. Final 1/3: Present your novel contribution (i.e. the reason you are giving the talk). Once you’ve got both the experts and non-experts on the same page in terms of the finer details and scientific context that leads up to your project, you can finish the talk by telling them all something new. In this part of the talk, you are the expert in the room and this is your opportunity to teach the audience something new and explain to them why it’s important. The best part of this section is that it’s the part that you know the most about. Let your ideas, graphs, and data shine through and conclude with a discussion on the impacts of your work in a way that everyone can follow and understand. While following this strict set-up may sound tedious, it’s the most effective way to keep people interested in what you’re presenting. Don’t think that since everyone at your talk is an expert that you can just jump straight into a more in-depth background to save time, or that the in-depth background is boring and redundant and just go straight to your results from the introduction. Doing so will make it easier to lose members of your audience and will jumble your story around so much that it will be hard to follow or understand why it’s important. Structuring your talk in these three sections gives you an easy template to work with and will make the next five steps slightly easier*. Luckily for you (and me), that should be enough work for you until next week when you get the actual Five Easy* Steps for a Perfect** Presentation. Until next week, happy story boarding! |
Archives
August 2018
Categories
All
|
Addtext

 RSS Feed